You’re dealing with a furnace that won’t ignite and is colder inside than you’d like. Before you call in a professional, you can try several diagnostics tips yourself. Start with the basics—check your thermostat settings and verify the power supply is connected. Then, take a closer look at the ignition components and gas supply. Each step could lead you to the culprit behind the ignition failure. But what if the issue persists? Understanding the more intricate parts, like the blower motor and control board, might be your next move.
Check the Thermostat Settings
Begin by verifying your thermostat is set to the correct mode and temperature, as incorrect settings can prevent the furnace from igniting. First, confirm that the thermostat is in the ‘heat’ mode. It sounds simple, but it’s an easy oversight that can lead to unnecessary troubleshooting. Next, set the temperature at least five degrees higher than the current room temperature. This guarantees the thermostat signals the furnace to start.
Check the thermostat’s power supply. If it’s battery-operated, replace the batteries to rule out power issues. For thermostats connected to your home’s electrical system, verify that the circuit is functioning properly. A tripped breaker could be the culprit, leaving your thermostat powerless to communicate with the furnace.
Examine the thermostat’s wiring, confirming connections are secure and intact. Loose or corroded wires can disrupt signals, preventing ignition. If you feel comfortable, gently tighten any loose screws securing the wires.
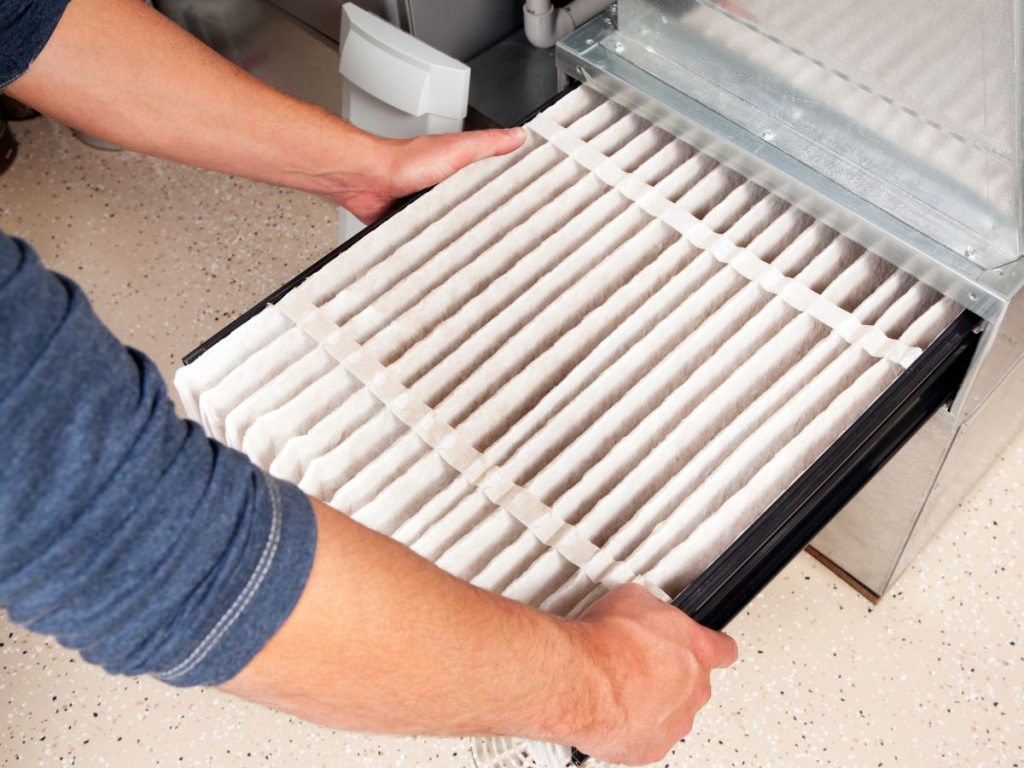
Inspect the Furnace Filter
After verifying your thermostat settings are correct, the next step is to inspect the furnace filter for any blockages or dirt buildup that might impede airflow and prevent the furnace from igniting effectively. Begin by turning off the furnace to guarantee safety. Locate the filter compartment, typically found between the furnace’s air handler and the return duct. Carefully slide the filter out, noting its orientation for proper reinstallation.
Examine the filter closely. A clogged filter can restrict airflow, causing the furnace to overheat and shut down before achieving ignition. If the filter appears dark, dusty, or debris-covered, it’s time for a replacement. Opt for high-efficiency filters, which capture more particulates and improve overall air quality. Remember, replacing the filter every one to three months, depending on usage and environmental factors, is crucial.
While handling the filter, inspect the filter compartment for any dust or debris that may have accumulated. Clean this area gently to maintain ideal airflow. Once everything is clean and the new filter is in place, secure the compartment and restore power to the furnace. This simple maintenance step supports efficient operation and reliable ignition, guaranteeing comfort for those you serve.
Examine the Power Supply
Confirm the furnace receives adequate power by checking the circuit breakers and verifying that the power switch near the unit is turned on. Locate your home’s electrical panel and inspect the breaker labeled for the furnace. If the breaker tripped, reset it by turning it off and back on. This guarantees the circuit is complete and the unit can draw the necessary electricity.
Next, verify that the power switch, typically a light switch located on or near the furnace, is in the ‘on’ position. This switch is vital as it directly affects the furnace’s ability to operate. Sometimes, it can be accidentally turned off during maintenance or cleaning.
Additionally, examine any visible wiring for signs of damage or wear, such as frays, cuts, or burn marks. Damaged wires can interrupt power flow, leading to ignition issues. If you find any issues, it is important to consult a licensed electrician to repair or replace the wiring safely.
Test the Ignition Switch
Once you’ve verified the power supply is intact, focus on testing the ignition switch to diagnose any potential faults in the ignition system. Begin by locating the ignition switch, typically found near the burner assembly. Use a multimeter to check for continuity. Disconnect the wires connected to the ignition switch with the furnace power off. Set your multimeter to the continuity setting and place the probes on the terminals of the switch. A continuous beep or reading on the multimeter confirms that the switch is operational. If there’s no continuity, the ignition switch is likely faulty and needs replacement.
Next, visually inspect the switch for wear, corrosion, or damage. Gently clean any accumulated debris using a soft brush or cloth. When reassembling, ensure all connections are secure, reducing the risk of loose contacts, which could lead to ignition issues.
For those committed to serving others, remember that safety is paramount. Always consult the furnace’s manual for specifics on handling components and follow manufacturer instructions. By confirming the ignition switch is in good working condition, you’re one step closer to restoring reliable heat for those relying on you.
Evaluate the Gas Supply
To effectively diagnose ignition failure, confirm the gas supply is consistent and unobstructed by checking the gas valve and pressure levels. Begin by confirming the gas valve is in the ‘on’ position. If it’s off, simply turning it on could resolve the issue. Next, inspect for any visible damage or obstructions near the gas valve that might impede the gas flow. Safety is paramount, so confirm that the area is flammable materials or debris-free.
Measure the gas pressure using a manometer. Attach it to the pressure test port on the gas valve to verify the pressure aligns with the manufacturer’s specifications. If the gas pressure is too low, it might not provide sufficient fuel for ignition, causing failure. Conversely, excessive pressure can lead to incomplete combustion or damage.
Check the supply pipe for kinks or bends that could restrict flow. Contact a professional for proper realignment or replacement if you detect any irregularities. Finally, listen for hissing sounds indicating gas leaks. If you suspect a leak, don’t attempt repairs; evacuate the area and contact a qualified technician immediately for safe resolution.
Look at the Pilot Light
Inspect the pilot light to confirm it’s lit and burning steadily, as an unstable or extinguished pilot can prevent the furnace from igniting properly. Start by safely accessing the pilot assembly. Verify you know the type of pilot your furnace uses—standing pilot or intermittent. For a standing pilot, check that the flame is blue and steady. A yellow or flickering flame might indicate a clogged orifice or insufficient gas pressure. Clean the pilot assembly using a small brush or compressed air to remove any debris or dust that could obstruct the flame.
If the pilot is out, relight it following the manufacturer’s instructions. Turn off the gas valve before attempting to relight. Wait a few minutes to allow any residual gas to dissipate, preventing potential hazards. Use a long match or lighter to ignite the pilot, holding the gas control knob in the ‘pilot’ position.
For intermittent pilots, listen for the clicking sound of the ignition. If absent, check the electrical connections, making sure they’re secure. Replace any corroded or damaged wires. Always remember that confirming your pilot light is functioning correctly is essential for safe and efficient furnace operation, which helps you serve others by maintaining a warm and comfortable environment.
Investigate the Flame Sensor
After confirming the pilot light’s stability, turn your attention to the flame sensor, a crucial component for detecting the presence of a flame and guaranteeing the furnace functions safely. The flame sensor’s job is to prevent gas flow if no flame is present, reducing the risk of gas leaks. Here’s how you can effectively investigate this essential part:
- Locate the Flame Sensor: Typically, you’ll find it inside the burner assembly. Look for a thin, metallic rod in the path of the burner flame.
- Inspect for Dirt or Corrosion: A dirty or corroded sensor may not detect the flame properly, leading to ignition failure. Clean it with a fine steel wool or emery cloth to remove any buildup.
- Check the Electrical Connections: Verify the wire connections to the sensor are secure and free of damage. Loose or corroded connections could disrupt the sensor’s function.
- Test the Sensor’s Functionality: A multimeter measures the sensor’s electrical resistance. A reading outside the manufacturer’s specified range indicates it may need replacement.
Assess the Ignition Module
The ignition module, acting as the furnace’s brain, orchestrates the lighting process, verifying it’s receiving power and sending signals to the igniter without interruption. Begin by confirming the module’s power supply; use a multimeter to check for the manufacturer’s specified voltage at the terminals. Loose or corroded connections can impede power flow, so ensure all wires and connectors are secure and clean. Next, inspect the condition of the module’s circuit board for any visible signs of damage, such as burnt components or cracked solder joints, which could indicate a malfunction.
Check if the module is sending signals to the igniter. Listen for a clicking sound when the thermostat calls for heat, signaling the module’s attempt to ignite the burner. If absent, the module might be faulty. Additionally, examine the LED indicator light on the module—if present—for diagnostic codes. Refer to the furnace’s manual to interpret these codes, pinpointing potential issues. Replace the module only if tests suggest it’s defective, as it’s essential for coordinating the ignition sequence. By diligently evaluating the ignition module, you guarantee your furnace functions safely and efficiently, ultimately serving the comfort and well-being of those relying on you.
Analyze the Blower Motor
To guarantee ideal furnace performance, check if the blower motor receives proper voltage and has a secure electrical connection. This verifies the motor runs efficiently and prevents ignition failure. If the motor isn’t functioning correctly, use these diagnostic steps:
- Inspect the Bearings: Verify the blower motor’s bearings are well-lubricated and not worn out. Worn bearings can cause the motor to work harder, leading to overheating and possible ignition issues.
- Examine the Capacitor: The capacitor provides the necessary starting torque for the motor. If faulty, the motor might not start or run at peak speed. Use a multimeter to test and replace the capacitor’s capacitance if needed.
- Check for Obstructions: Clear any debris or blockages in the blower wheel. Obstructions can hinder airflow, causing the furnace to overheat and shut off before igniting properly.
- Test the Motor Windings: Use a multimeter to check for continuity in the motor windings. A lack of continuity could indicate a burned-out motor requiring replacement.
Review the Control Board
Once you’ve verified the blower motor is functioning correctly, focus on the control board as it orchestrates the furnace’s ignition sequence and operational commands. Begin by turning off the power to the furnace for safety. Open the access panel to locate the control board, often a rectangular circuit board with various connectors and wires. Inspect the board for any visible signs of damage, such as burnt marks, bulging capacitors, or loose connections.
Next, check the LED indicator on the control board. Most modern control boards have a diagnostic LED that blinks codes to indicate specific issues. Refer to the furnace’s manual to decipher these codes, as they can guide you to the root of the problem, like a faulty ignitor or pressure switch. Use a multimeter to test the voltage across critical terminals. Confirm that the board receives proper power and outputs the necessary signals to ignite the furnace.
If the control board shows signs of malfunction, consider replacing it. Document each step and component checked, as this record will assist in maintaining efficient furnace operation and confirm you’re ready to serve others effectively in a warm and comfortable environment.
Conclusion
By following these diagnostic tips, you’ll efficiently tackle furnace ignition failures. Some might think it’s too technical, but you can handle it with patience and attention to detail. Start by checking the thermostat and power supply, then process each component methodically. You’ll find that regular maintenance, like replacing filters, can prevent many issues. Remember, understanding your furnace’s workings solves problems and keeps your home warm and safe.
Frequently Asked Questions
How Can Weather Conditions Affect Furnace Ignition?
Weather conditions can affect furnace ignition by causing moisture buildup, rusting components, or obstructing exhaust vents. You should routinely check these parts for weather-related damage to guarantee the furnace operates efficiently, keeping everyone warm and safe.
What Role Does Regular Maintenance Play in Preventing Ignition Failures?
Imagine your furnace as a loyal knight guarding your home. Regular maintenance is its armor, preventing ignition failures by ensuring safety, efficiency, and longevity. You’re the caretaker, ensuring this guardian stays battle-ready for those cold nights.
Are There Any Warning Signs of an Impending Furnace Ignition Failure?
You can spot warning signs like frequent cycling, unusual noises, or a pilot light that won’t stay lit. Check for soot buildup or a yellow burner flame, indicating combustion issues that need immediate attention to prevent failures.
Can a Faulty Thermostat Wiring Cause Ignition Issues?
Could faulty thermostat wiring cause ignition issues? Absolutely. When loose or damaged wires disrupt the signal to the furnace, preventing proper ignition. Ensure all connections are secure and repair any frayed or broken cables promptly.
How Does Furnace Age Impact the Likelihood of Ignition Failure?
As your furnace ages, components wear out, increasing ignition failure risk. Aging systems may have outdated technology, making repairs challenging. Regular maintenance reduces failures, ensuring your clients’ comfort and safety while extending the furnace’s lifespan.